Get started as an Uber Eats driver
Kulujen lisääminen kululaskupohjalle | Truster laskutuspalvelu
Pricing
Light entrepreneur
*) Truster Turva includes accident, liability and legal expenses insurance. The optional Maksuvahti service costs €1.99/invoice and protects your receivables throughout their lifecycle, from invoice to payment. Note: Uber Eats pays directly into your own bank account; Truster handles your bookkeeping and taxes.
Why Truster
Set up a Business ID
We help you set up a Business ID (Y-tunnus) and take care of the first steps needed to get started as an Uber Eats driver.
Bookkeeping handled for you
Truster handles your bookkeeping for you. Just send us your Uber Eats report once a month through the app's support request section — we'll take care of the rest.
Get support
Starting out as an entrepreneur can feel confusing, but you don't have to figure it out alone. Truster guides you and makes entrepreneurship easier to understand.
How to get started
- 01
Start your application
Go to uber.com/fi/en/deliver/ or sign up in the Uber Driver app.
- 02
Fill in your basic details
Fill in the initial details needed to create your account, such as: - your city - a referral code, if you have one
- 03
Choose your delivery method
Select "Delivery" as your earning method and choose your vehicle (bicycle, moped, car).
- 04
Add your vehicle details
Fill in your vehicle details: - make - model - model year - registration number
- 05
Upload your ID
Upload a photo of your passport or ID card.
- 06
Upload your driving licence
Upload a clear photo of your driving licence.
- 07
Upload a profile photo
Add a clear profile photo.
- 08
Upload a photo of your delivery bag and ID
Take and upload one photo showing: - your insulated delivery bag - your ID The bag must be open, the whole bag must be visible, and the name and photo on your ID must be clearly legible. You can also use another company's bag, such as a Wolt bag.
- 09
Upload your bank statement
Upload a photo of your bank statement or bank account document. The following must be visible: - the account holder's name - the IBAN number
- 10
Upload your vehicle insurance
Upload a photo of your vehicle insurance document.
- 11
Fill in your tax details
Complete your business and tax details. Select "individual" as your business type. Add your sole proprietorship's name, street address, city, postal code and country.
- 12
Accept the terms
Read and accept the terms to continue.
- 13
Wait for confirmation
Once your application is complete, Uber will review it and let you know when you can start delivering.
Bookkeeping runs in the background
Truster handles your bookkeeping — you focus on deliveries.
Illustration: a user scans a receipt, after which the seller, date, VAT and amount are filled in automatically and the receipt is recorded.
Frequently asked questions
Does my Uber Eats profile need to be created with my own Business ID?
Yes. Your Uber Eats driver profile must be created under your own Business ID (Y-tunnus). This ensures that payments, reporting, bookkeeping and taxes are handled correctly.
What makes a document photo acceptable?
Uber may reject photos that don't meet its requirements. Make sure that: - the photo is clear - all text is legible - all four corners of the document are visible - the photo isn't cropped too tightly
Can I use another company's delivery bag?
Yes. You can use a bag from another company, such as a Wolt bag, as long as the bag photo meets Uber's requirements.
The app says onboarding is delayed in my city. What does that mean?
This is normal: onboarding can take longer than usual in your city. Still, upload all the requested documents and complete your application. Uber will notify you separately — usually by email or in the app — once your account is activated and you can start driving.
Who receives the Uber Eats payments?
Uber Eats pays directly into your own bank account, not through us.
How does the bookkeeping work?
Once you start delivering, send us your monthly Uber reports through the app's support request section. Based on these, we'll handle your bookkeeping and taxes.
Guides
Creating and sending invoices
A draft invoice for adding expenses incurred from your partner's gigs first appears in your profile with an amount of 0.00 €. Once we receive the billing data from the client, we automatically combine the fee details with the draft invoice information. An invoice with the total amount will then be created in your profile, and you can track its status through the app. This means you don't need to create or send invoices for these assignments yourself. How do I create an invoice for another assignment? If you also do other assignments for which you create your own invoices, you can easily create invoices directly in the Invoices section of the app. You can find more detailed instructions for creating other invoices here.
How do I add expenses as a light entrepreneur
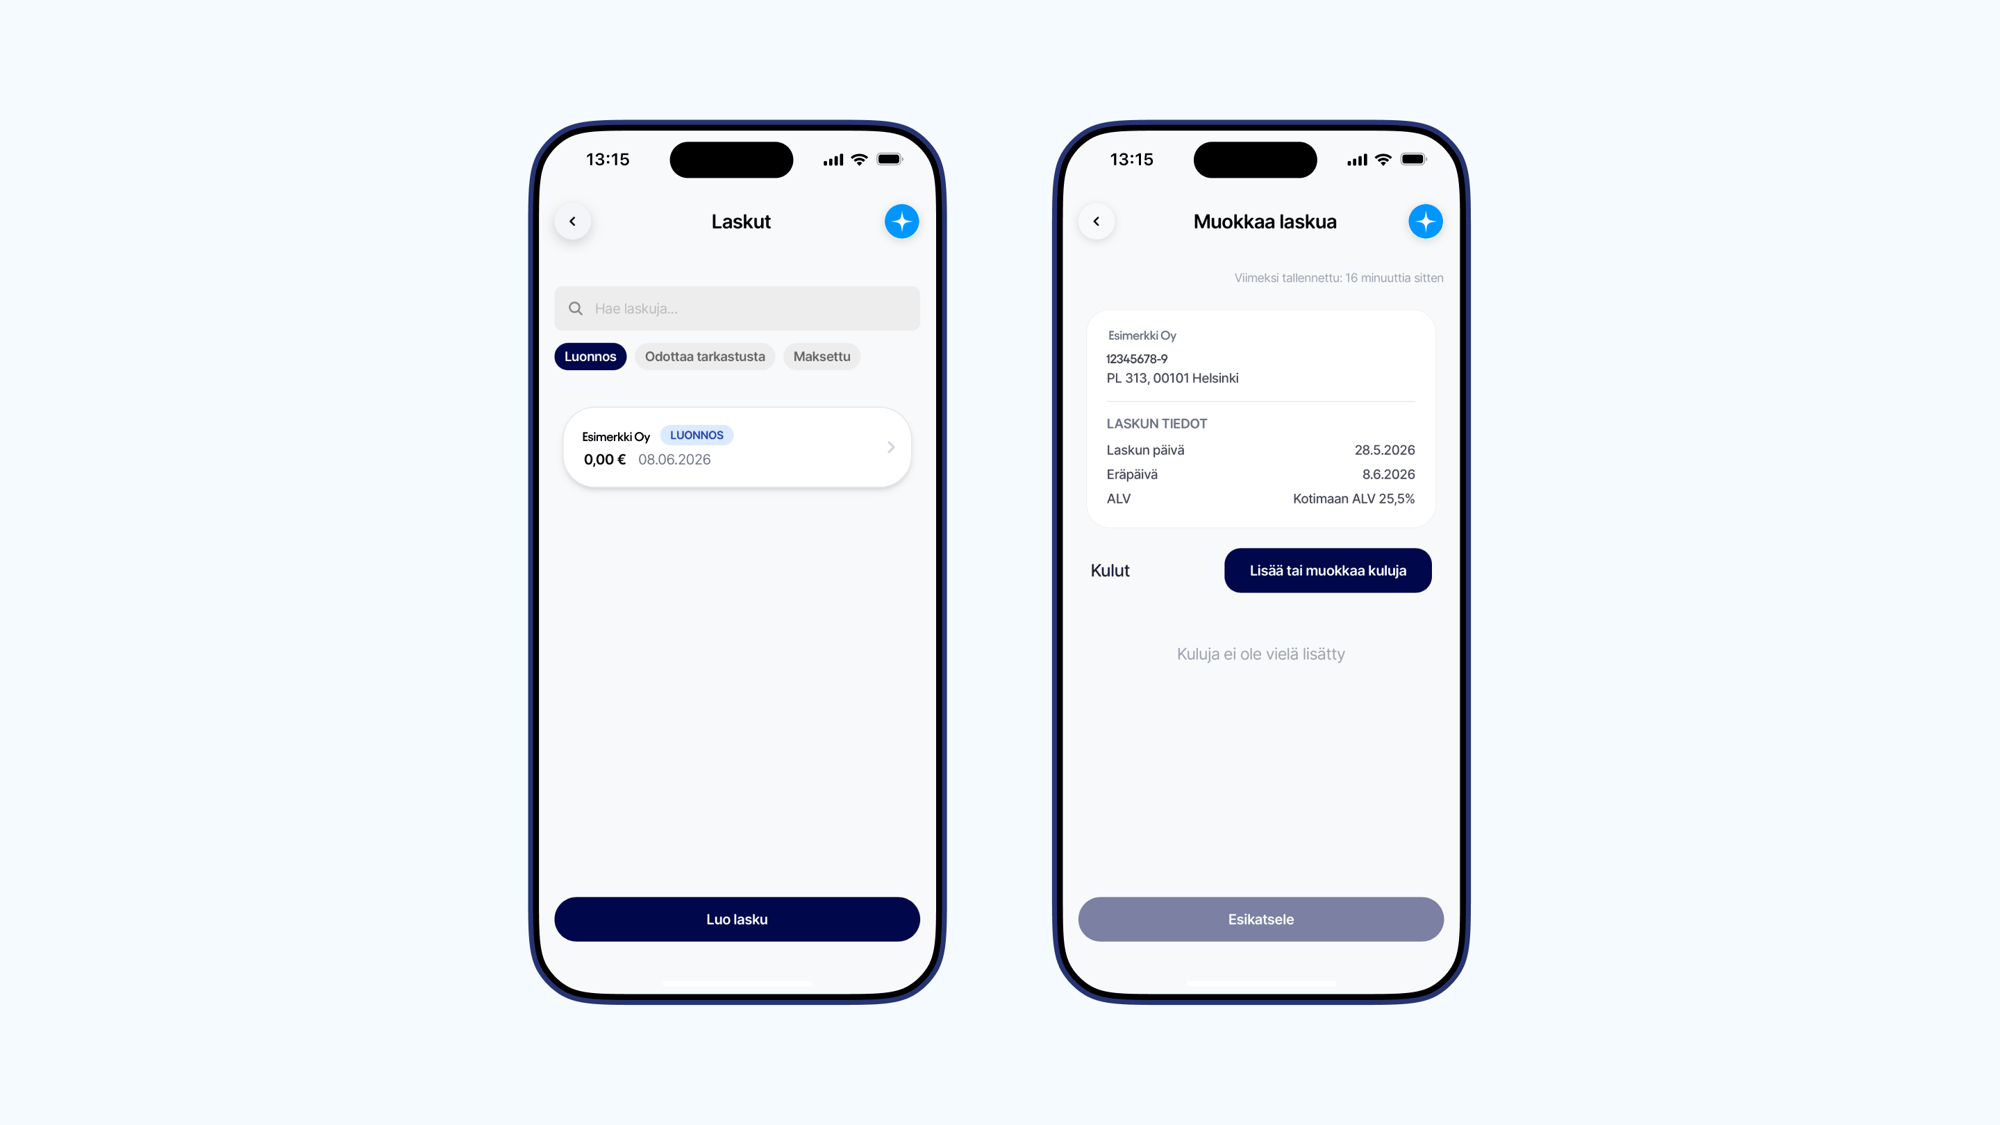
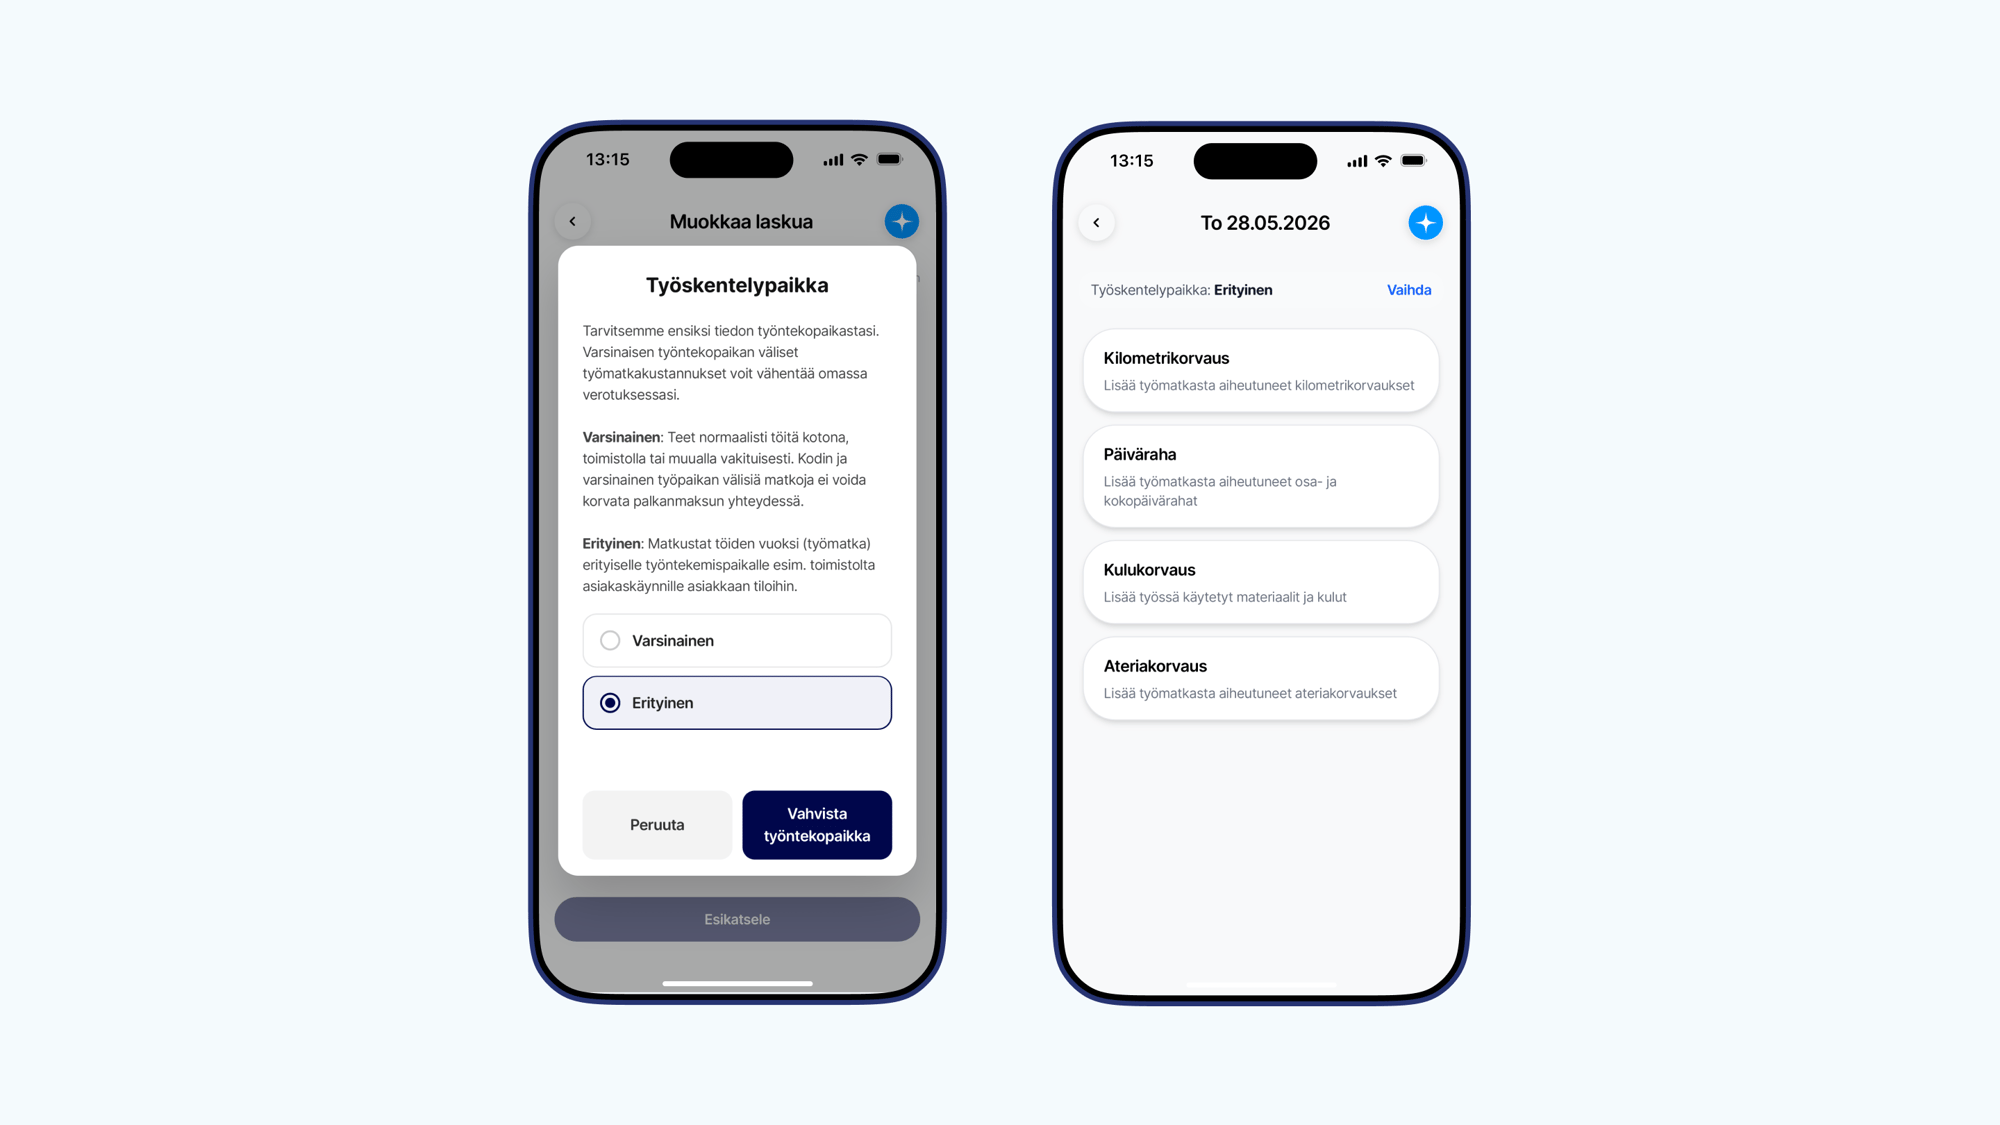
Truster creates invoices on your behalf based on information received from the client, so you don't need to create or send an invoice yourself. Your task is simply to add your own travel expenses and reimbursements to the ready-made draft invoice in your profile during the work period, if you want them to be tax-free when your fee is paid. By adding travel expenses to the draft invoice, you make sure you receive the tax-free reimbursements you're entitled to right away when your fee is paid, meaning more money in your pocket! Expenses that have been accounted for in the fee payment do not need to be reported separately to the Tax Administration. Please note that fuel, charging, or material costs cannot be added to the invoice as tax-deductible expenses as a light entrepreneur. These can instead be added to your own personal tax return as income-related expenses. The video covers the following topics: • 1:45 Adding mileage allowances • 3:19 Adding per diems • 5:42 Adding expense reimbursements 1. Start from the invoice Open the Truster app and go to the Invoices section to the draft invoice you want to add expenses to. Select Add row and then Add or edit expenses. 2. Select the place of work When adding expenses for completed gigs, set the place of work as Special. If you work permanently in the same place, such as at home or at an office, that is considered your actual place of work. In that case, trips between home and the workplace are usually not reimbursed. Finally, check the expenses See the expense-specific instructions below. Once all expenses have been added, check the details and make sure all expenses are included. You don't need to send the invoice yourself — we will match the expenses to the correct gig once we receive the billing information from the client.
What is light entrepreneurship
Light entrepreneurship is a form of work that allows a private individual to invoice for their own expertise without having their own business ID or setting up a company. A light entrepreneur finds their own clients and agrees on the content and price of the work themselves, but invoicing is handled through an invoicing service. Light entrepreneurship is especially suitable for those who want to try entrepreneurial-style work in an easy and flexible way.
Adding a receipted expense reimbursement as a light entrepreneur
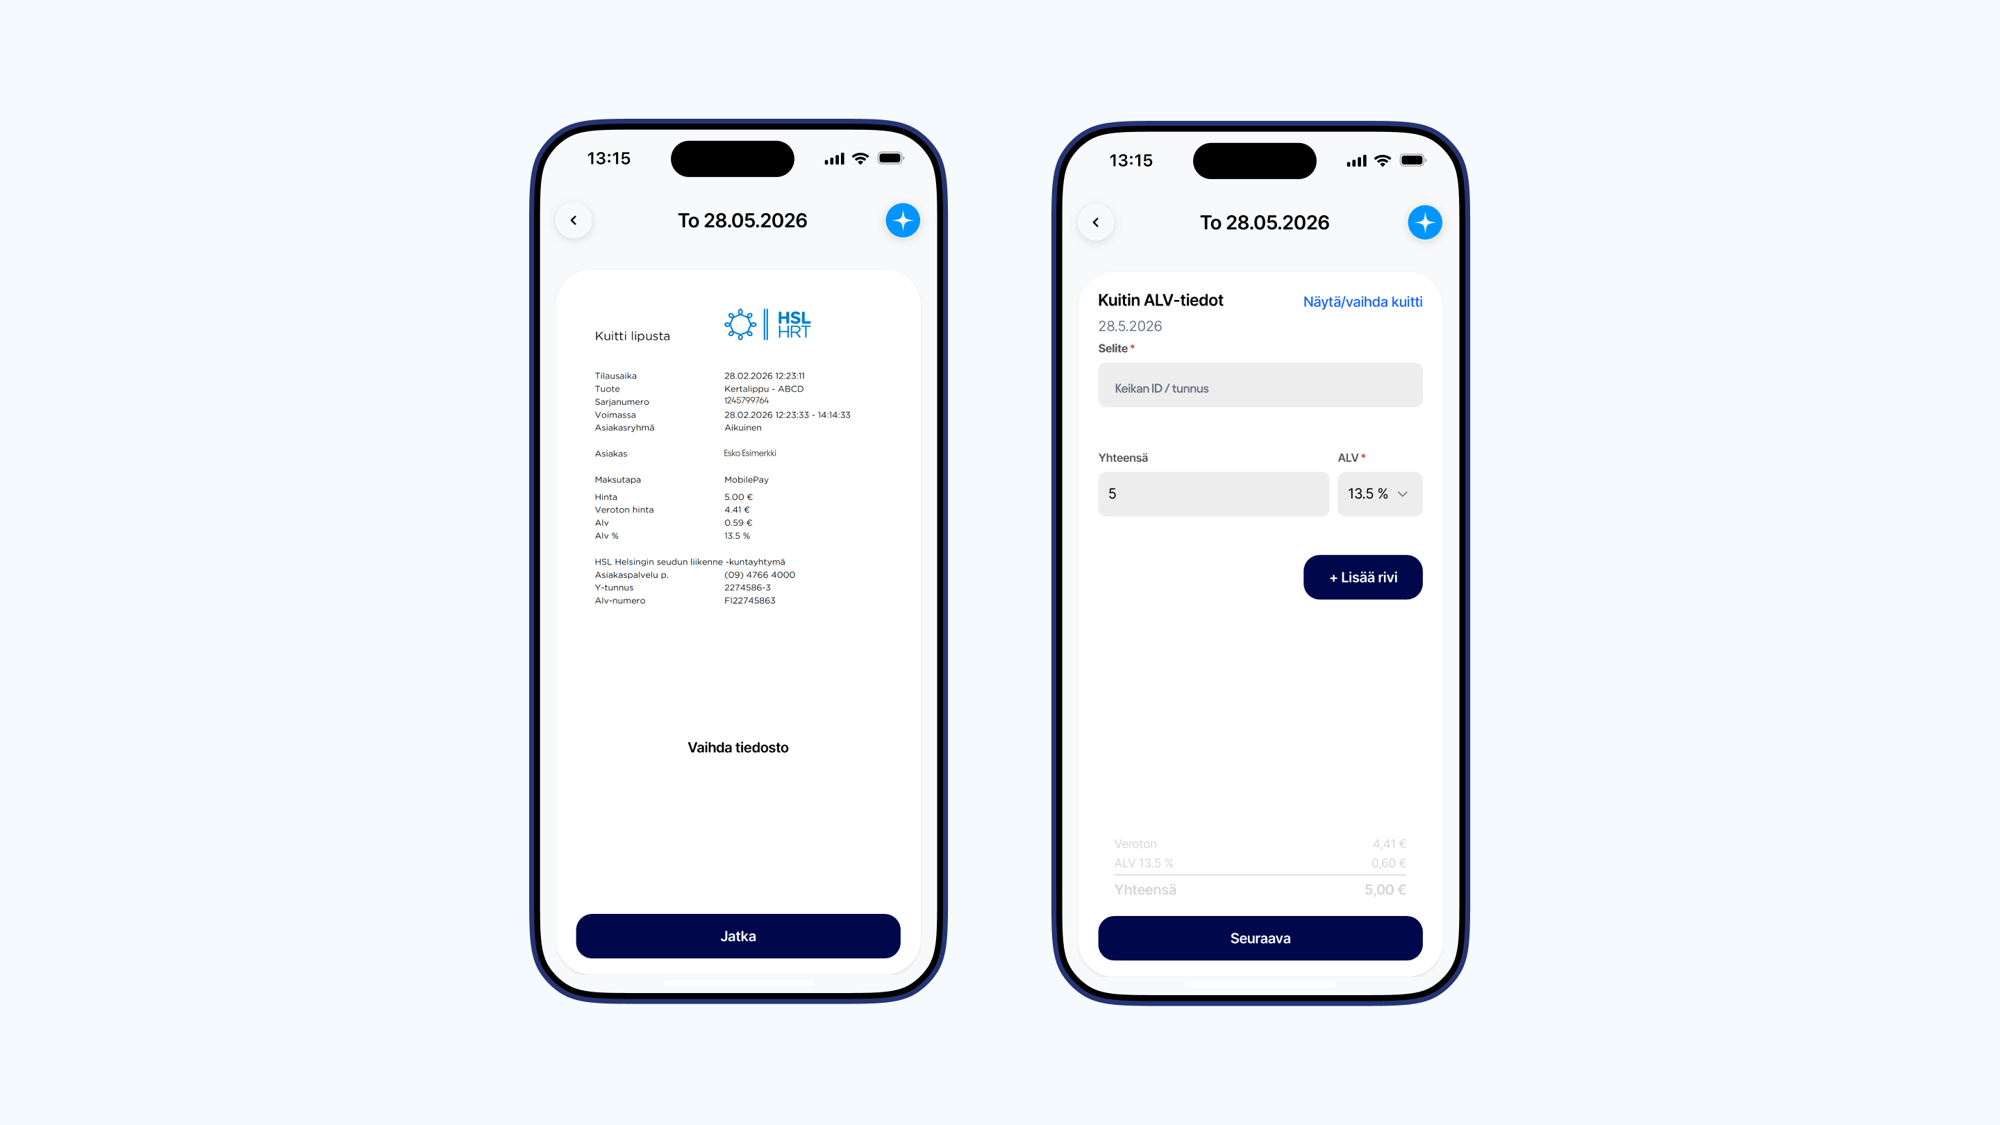
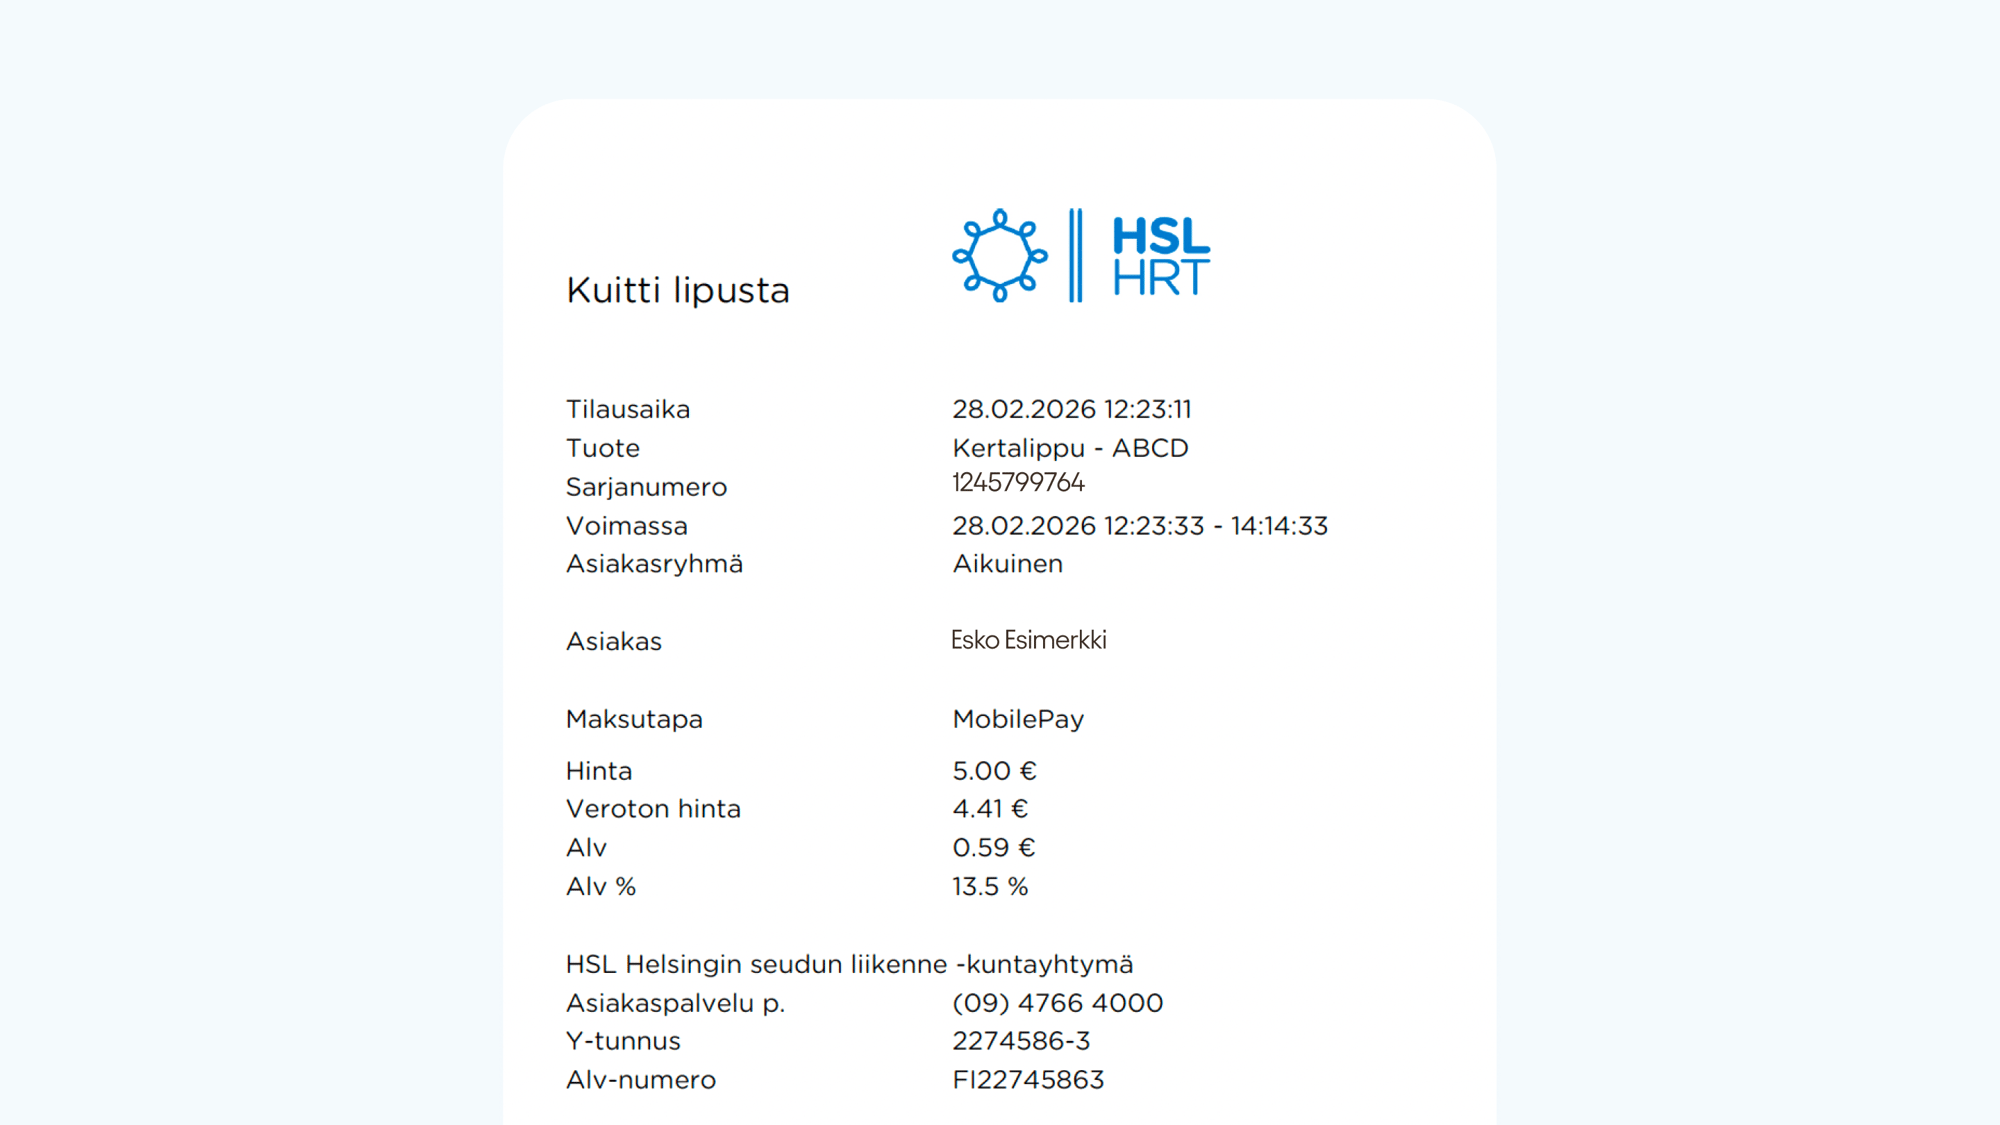
First, select the date for which you want to add an expense. Then select Expense reimbursement. Add the receipt • take a photo of the receipt or upload a file • enter the amount of the expense • add the VAT details as shown on the receipt Domestic purchases: add the total amount and the VAT shown on the receipt Foreign purchases: add the amount in euros and VAT 0 % Add a description In the expense description, add the gig ID/reference that the expense relates to. An acceptable receipt Make sure that the receipt you add for the deduction is acceptable. An acceptable receipt includes: • seller details (company name and business ID) • price breakdown • amount of VAT • date
Adding a per diem as a light entrepreneur
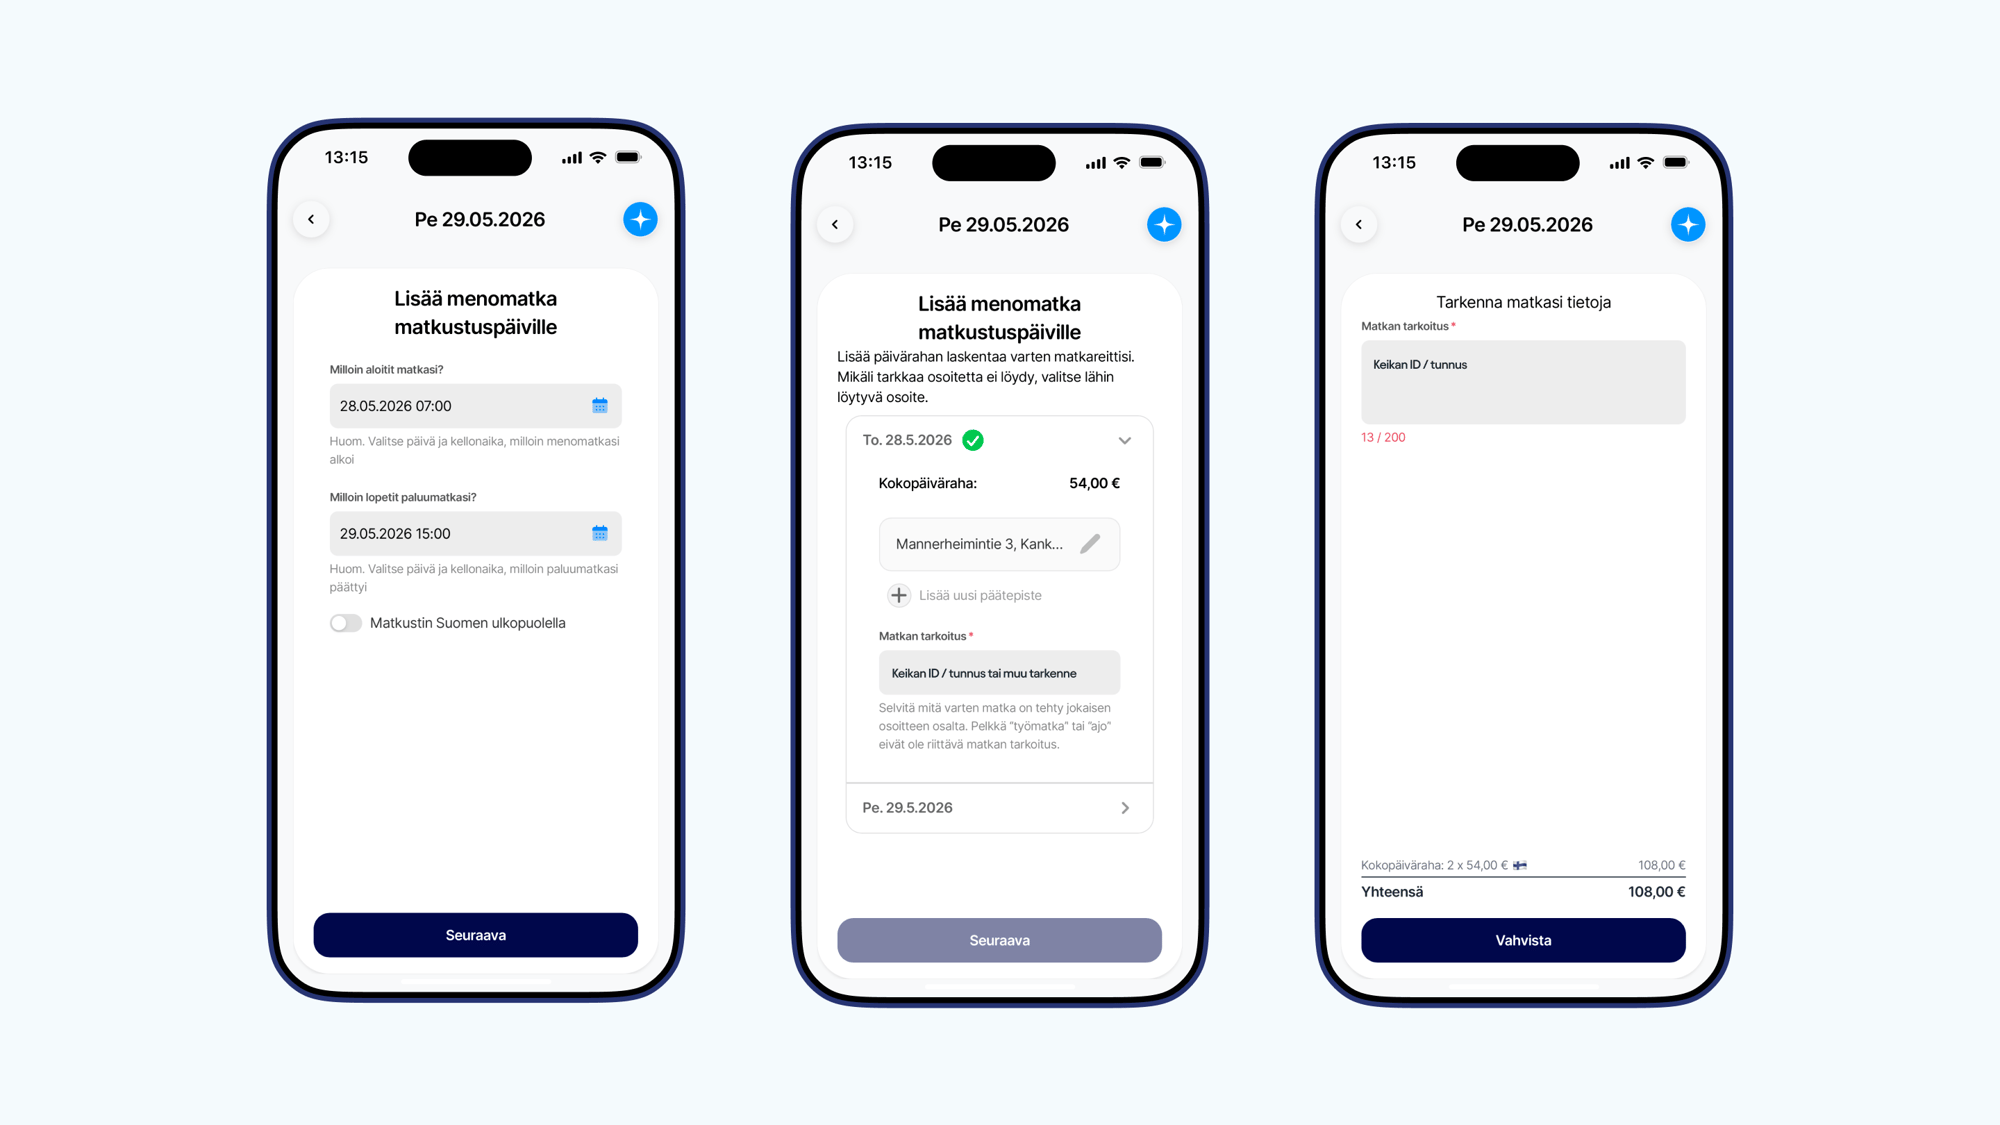
If your work trip entitles you to a per diem, select Per diem and fill in: • the start and end time of the trip • the destination address • transit addresses, if you changed location In the description, add the gig ID/reference that the per diem relates to. Please note that the home address in your profile is automatically used as the starting address, so you only need to add the destination address. Make sure your home address is up to date in the My Details section.
Adding a mileage allowance as a light entrepreneur
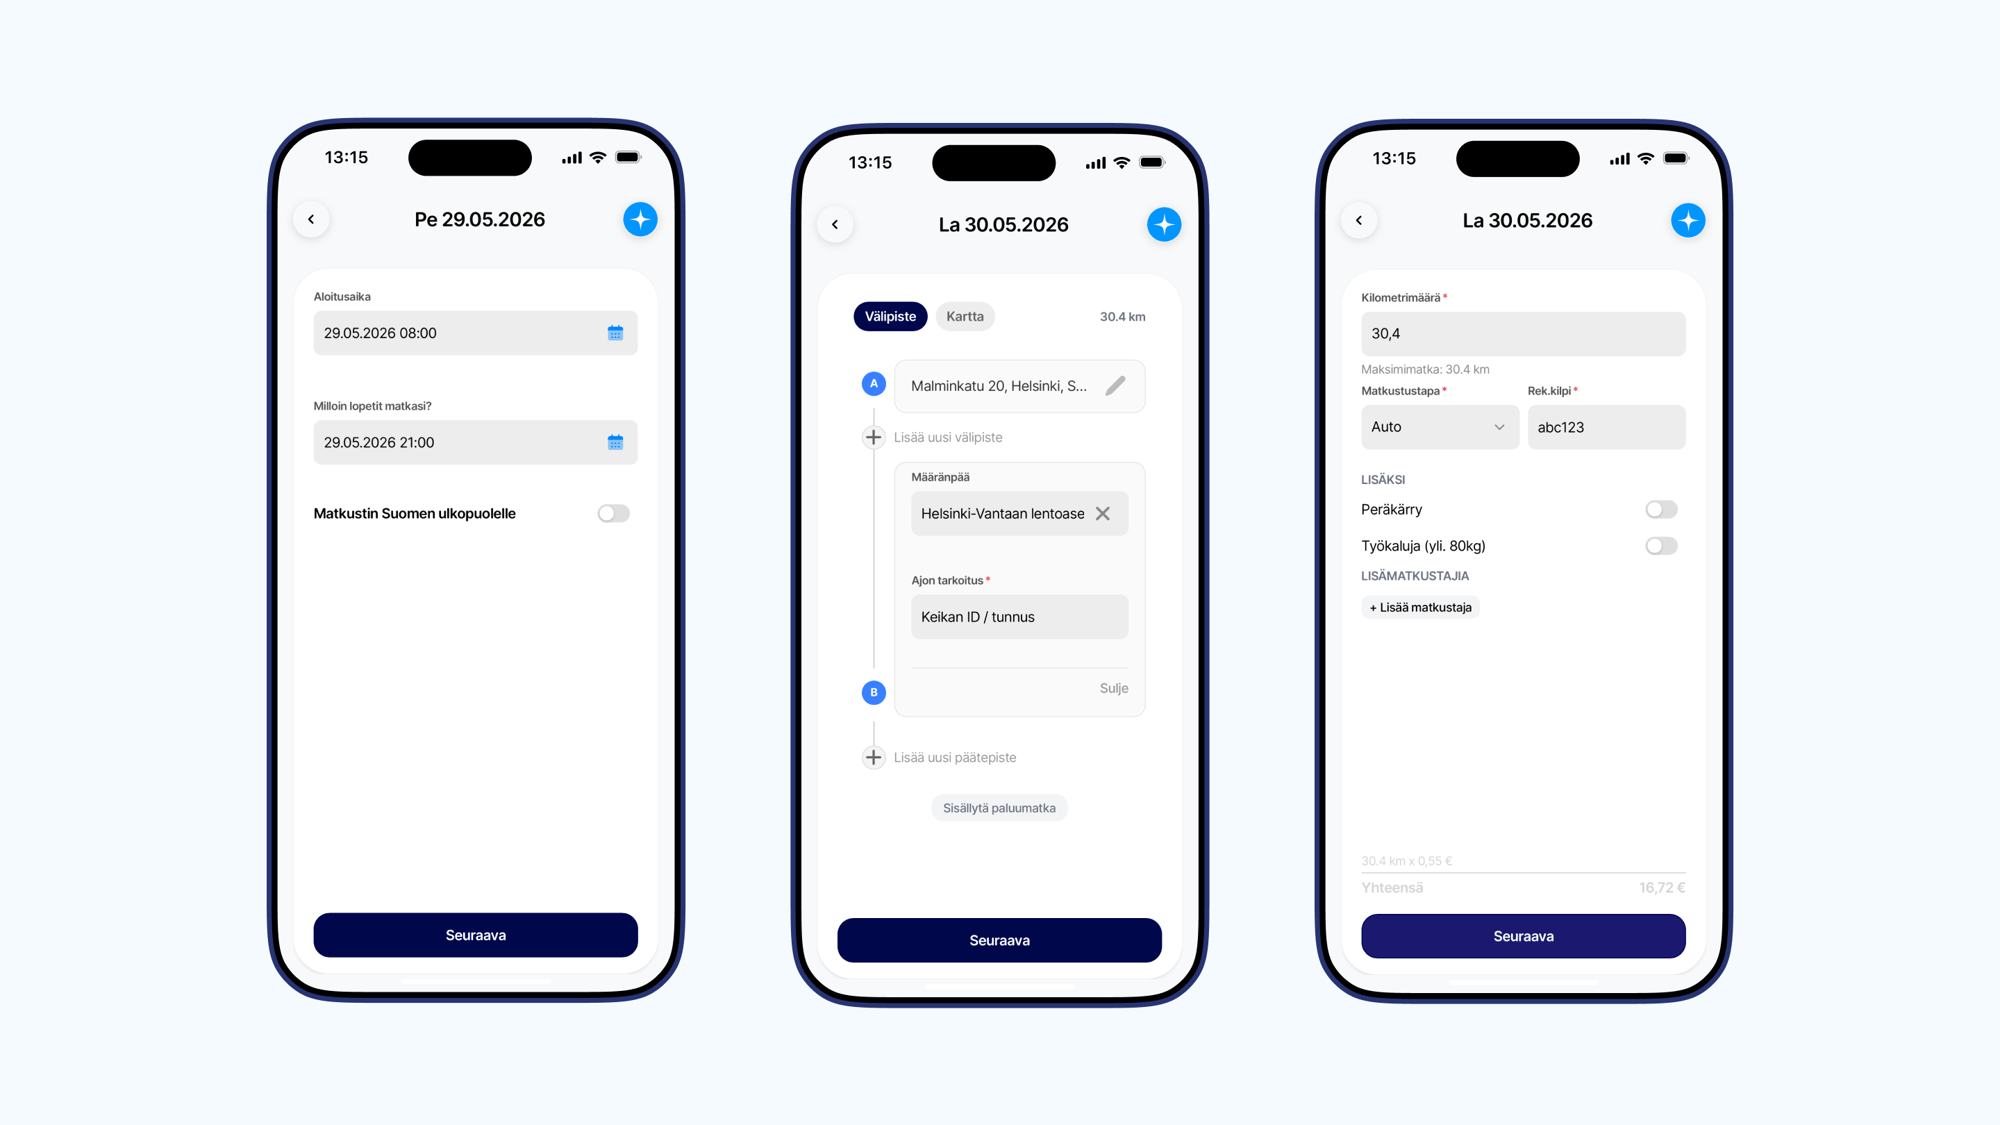
Select Mileage allowance and fill in: • start time • end time • starting address • destination • purpose of the trip (gig ID/reference) • vehicle details If the trip included several stops, add them to the route. If you returned to the starting point, select Include return trip. If you traveled by car, also add the registration number.
Ready to start delivering?
Sign up and get started in minutes.